Mumbles Lighthouse Landscape Photography: The Ultimate Guide
By Gary Gough, Professional Photographer
Introduction
Mumbles Lighthouse Landscape Photography combines rugged coastal beauty, historic architecture, and ever‑changing light to create unforgettable images. Nestled on the south coast of Wales, Mumbles Lighthouse stands guard over Swansea Bay, offering photographers dramatic seascapes, golden sunrises, and moody stormy scenes. In this in‑depth guide, I’ll share my top tips for capturing stunning photographs of Mumbles Lighthouse, including the best time of day to shoot, why tide heights matter, a brief history of the lighthouse, local amenities, and parking advice.

In this video, I take on the challenge of photographing Mumbles Lighthouse, shooting directly into the sun. It’s a difficult technique, but incredibly rewarding when done well!
Why Mumbles Lighthouse Landscape Photography?
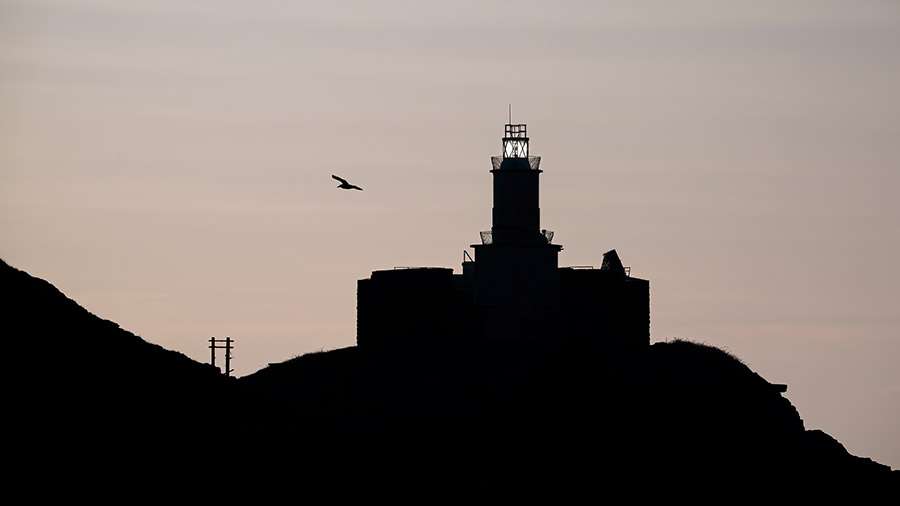
Mumbles Lighthouse is an icon of the Welsh coastline. Its white tower structure, standing 56 feet (17 meters) tall, stands proudly against the ocean waves and pastel skies. Whether you’re an experienced landscape photographer or a keen amateur, this location offers:
Dynamic Light: Sunrises and sunsets paint the sky in pinks, oranges, and purples.
Changing Tides: Exposed rocks, reflective wet sand, and crashing surf provide endless variations.
Historic Charm: The lighthouse is built in the 18th century and adds a timeless focal point.
Accessibility: Easy parking and nearby amenities make it a comfortable shoot location.

A Brief History of Mumbles Lighthouse
Understanding the history of your subject adds depth to your images. Mumbles Lighthouse was first established in 1794 following a series of tragic shipwrecks off Bracelet Bay. The original structure was a simple stone tower, replaced in 1860 by the current cast‑iron lighthouse with its distinctive red lantern. In 1897, improvements included a more powerful optic and a foghorn to warn ships in low visibility. Today, the automated beacon remains a vital navigational aid while serving as a beloved photographic landmark.
Best Time of Day for Photography
Mumbles Lighthouse Landscape Photography
Golden Hour Magic
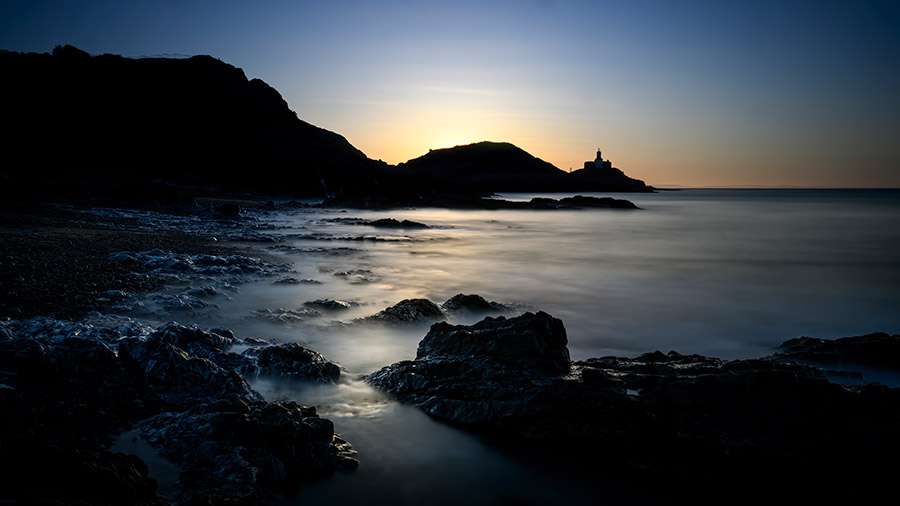
The optimal time for Mumbles Lighthouse Landscape Photography is during the golden hour, roughly 45 minutes before and after sunrise, and again before sunset. At these times:
- The low sun angle creates long shadows that accentuate the texture of rocks and sand.
- Warm, soft light bathes the lighthouse, enhancing its white and red hues.
- Reflections on wet sand and tidal pools add visual interest and symmetry.
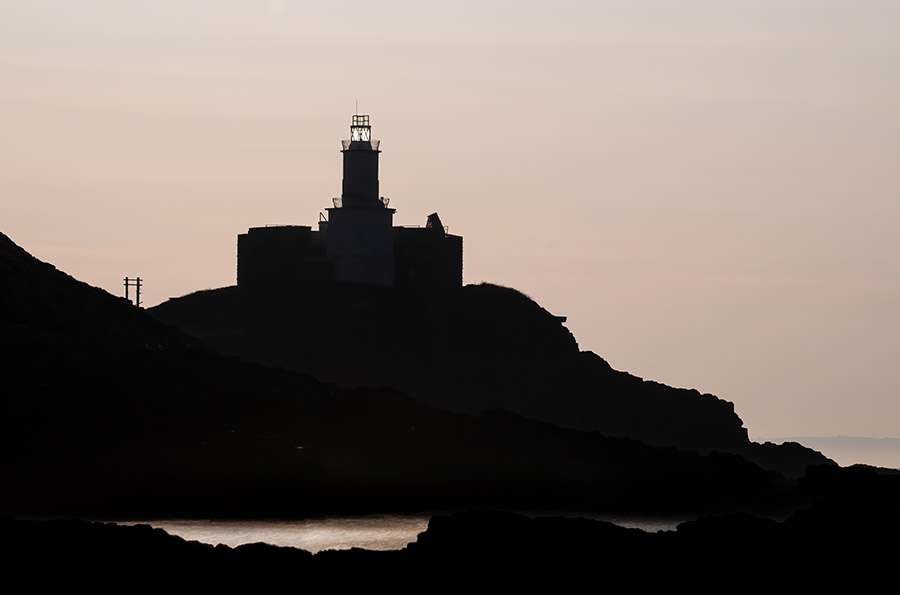
Importance of Tide Heights
Tide heights dramatically alter the foreground of your compositions:
- Low Tide exposes rocky outcrops and tidal pools, perfect for leading lines toward the lighthouse.
- Mid Tide offers a balance of water and rocks, capturing wave motion around the base.
- High Tide brings the sea close to the lighthouse platform, ideal for dramatic wave‑crash shots.
Always check a reliable tide timetable before your shoot. I recommend planning sessions around a mid‑to‑low tide to reveal foreground details, then returning at high tide for powerful seascapes.
Scouting the Local Area
Mumbles is more than just a lighthouse. The charming village features:
-
Mumbles Pier: A great vantage point for side‑on lighthouse shots.
-
Bracelet Bay: Sandy beach with rocky shelves, ideal for sunrise reflections.
-
Oystermouth Castle: Perched on a hill above, offering elevated views over Swansea Bay.
-
Local Cafés: Grab a Welsh breakfast or coffee at The Pilot Café or The Boathouse before or after your shoot.
Exploring these spots gives you multiple perspectives and backup shooting locations in case of sudden weather changes.
Exact Location and Parking
-
Grid Reference: SS 621 884
-
Address: Mumbles Lighthouse, Mumbles Road, Swansea SA3 4DP
-
Parking: There is a pay‑and‑display car park at the end of Mumbles Road, just a two‑minute walk from the lighthouse. Early birds can snag free roadside parking along Mumbles Road, but always check signage to avoid fines.
From the car park, follow the promenade toward Bracelet Bay. The lighthouse sits on a rocky promontory, about a five‑minute stroll.
- I parked here which is just meters away from the beach where I photographed all the images on this page
Gear and Camera Settings
Recommended Gear
-
Camera: Full‑frame DSLR or mirrorless for dynamic range.
-
Lenses: 16‑35mm wide‑angle for expansive seascapes, 70‑200mm telephoto for compressed perspectives.
-
Tripod: Essential for sharp long exposures and low‑light shooting.
-
Filters:
-
ND filter (6‑stop or 10‑stop) for long exposures of water.
-
Graduated ND filter to balance sky and foreground exposure.
-
-
Remote Shutter Release: To eliminate camera shake.
Camera Settings
-
Aperture: f/8 to f/16 for optimal sharpness and depth of field.
-
ISO: Keep at ISO 100–200 to minimize noise.
-
Shutter Speed:
-
1/200–1/500 sec to freeze wave action.
-
1–5 seconds with ND filter for smooth, milky water effects.
-
-
Focus: Manual focus on the lighthouse or use autofocus, then switch to manual to lock.
Composition Tips
-
Rule of Thirds: Position the lighthouse off‑centre for a balanced scene.
-
Leading Lines: Use rock ridges and tidal channels to draw the eye toward the tower.
-
Foreground Interest: Include wet sand reflections, rock textures, or seaweed.
-
Frame Within a Frame: Shoot through arching rock formations or pier structures.
-
Vary Perspectives: Capture low‑angle ground‑level shots and elevated viewpoints from Oystermouth Castle.
Overcoming Challenges
-
Harsh Sunlight: Shoot during golden hour to avoid flat midday light.
-
Spray and Salt: Wipe your lens regularly and consider a rain cover for your camera.
-
Slippery Rocks: Wear sturdy, waterproof boots with good grip.
Post‑Processing Workflow
-
RAW Conversion: Use Lightroom, Photoshop or Capture One to recover highlights and shadows.
-
White Balance: Fine‑tune to enhance warm sunrise tones.
-
Contrast and Clarity: Add local contrast to bring out rock textures.
-
Graduated Masks: Balance sky brightness without affecting the foreground.
-
Crop and Straighten: Ensure the horizon line is level and the lighthouse stands tall.
Conclusion
Mumbles Lighthouse Landscape Photography offers a blend of history, dramatic coastlines, and dynamic light that few locations can match. By planning around golden hour, monitoring tide heights, and exploring the local area, you’ll capture images that stand out in any portfolio. As a professional photographer, I’ve returned to this spot time and again, and each visit reveals new creative possibilities.
Go ahead, set your alarm for sunrise, pack your gear, and discover the magic of Mumbles Lighthouse through your lens. Don’t forget to share your shots and tag me on Instagram at @garygoughphotography
Further Reading & Resources
- Link to my Fine Art video at Mumbles Lighthouse
-
Tide timetable for Swansea Bay
-
Oystermouth Castle visitor information
Gary Gough
Professional Photographer | West Yorkshire
www.garygoughphotography.co.uk
► WORKSHOPS
► ABOUT ME
► MY GEAR
► FACEBOOK
► YOUTUBE
► INSTAGRAM
Tell us about your thoughtsWrite message